- Request API Documentation
Request API Documentation
To evaluate model on Bingsu/zeroth-korean, run evaluate.py script, by:
python evaluate.py
myHFworkspace for tiny-model
Create a Chat [POST]
Create a new chat conversation.
Request
- Endpoint:
/create - Method:
POST - Content-Type:
application/json
Request Body
| Parameter | Type | Description |
|---|---|---|
| messages | list | List of messages in the chat |
| roles | list | List of roles corresponding to messages |
| audios | list | List of audio files in the chat (base64 encoded) |
Example
POST /create

{
  "messages": ["Hello", "How are you?"],
  "roles": ["user", "assistant"],
  "audios": ["SGVsbG8=", "SG93IGFyZSB5b3U/"]
}
C# Sample
public void CreateChat()
{
    StartCoroutine(CreateChatCoroutine());
}

private IEnumerator CreateChatCoroutine()
{
    string url = baseURL + "/create";

    Dictionary<string, object> data = new Dictionary<string, object>()
    {
        { "messages", new List<string>() { "Hello", "How are you?" } },
        { "roles", new List<string>() { "user", "assistant" } },
        { "audios", new List<string>() { "SGVsbG8=", "SG93IGFyZSB5b3U/" } }
    };

    string jsonData = JsonUtility.ToJson(data);

    UnityWebRequest request = UnityWebRequest.Post(url, jsonData);
    request.SetRequestHeader("Content-Type", "application/json");

    yield return request.SendWebRequest();

    if (request.result != UnityWebRequest.Result.Success)
    {
        Debug.Log("Create chat request failed: " + request.error);
    }
    else
    {
        string response = request.downloadHandler.text;
        Debug.Log("Create chat request succeeded. Response: " + response);
    }
}
Response
- Status Code: 201 CREATED
Response Body
| Parameter | Type | Description |
|---|---|---|
| id | string | ID of the created chat conversation |
Example
HTTP/1.1 201 CREATED

{
  "id": "60c98731e3c1aa3eb4b57d9c"
}
Get Chat Conversation [GET]
Retrieve a chat conversation by its ID.
Request
- Endpoint:
/<id> - Method:
GET
URL Parameters
| Parameter | Type | Description |
|---|---|---|
| id | string | ID of the chat conversation to retrieve |
Example
GET /60c98731e3c1aa3eb4b57d9c
C# Sample
public void GetChat(string id)
{
    StartCoroutine(GetChatCoroutine(id));
}

private IEnumerator GetChatCoroutine(string id)
{
    string url = baseURL + "/" + id;

    UnityWebRequest request = UnityWebRequest.Get(url);

    yield return request.SendWebRequest();

    if (request.result != UnityWebRequest.Result.Success)
    {
        Debug.Log("Get chat request failed: " + request.error);
    }
    else
    {
        string response = request.downloadHandler.text;
        Debug.Log("Get chat request succeeded. Response: " + response);
    }
}
Response
- Status Code: 200 OK
Response Body
| Parameter | Type | Description |
|---|---|---|
| messages | list | List of messages in the chat |
| roles | list | List of roles corresponding to messages |
| audio | string | Base64 encoded audio file |
Example
HTTP/1.1 200 OK

[
  {
    "message": "Hello",
    "role": "user",
    "audio": "SGVsbG8="
  },
  {
    "message": "How are you?",
    "role": "assistant",
    "audio": "SG93IGFyZSB5b3U/"
  }
]
Send Text Message [POST]
Send a text message in a chat conversation.
Request
- Endpoint:
/send/text/<id> - Method:
POST - Content-Type:
application/json
URL Parameters
| Parameter | Type | Description |
|---|---|---|
| id | string | ID of the chat conversation to send the message in |
Request Body
| Parameter | Type | Description |
|---|---|---|
| message | string | Text message to send |
| role | string | Role of the sender |
Example
POST /send/text/60c98731e3c1aa3eb4b57d9c

{
  "message": "What's your name?",
  "role": "user"
}
C# Sample
public void SendTextMessage(string id, string message, string role)
{
    StartCoroutine(SendTextMessageCoroutine(id, message, role));
}

private IEnumerator SendTextMessageCoroutine(string id, string message, string role)
{
    string url = baseURL + "/send/text/" + id;

    Dictionary<string, string> data = new Dictionary<string, string>()
    {
        { "message", message },
        { "role", role }
    };

    string jsonData = JsonUtility.ToJson(data);

    UnityWebRequest request = UnityWebRequest.Post(url, jsonData);
    request.SetRequestHeader("Content-Type", "application/json");

    yield return request.SendWebRequest();

    if (request.result != UnityWebRequest.Result.Success)
    {
        Debug.Log("Send text message request failed: " + request.error);
    }
    else
    {
        string response = request.downloadHandler.text;
        Debug.Log("Send text message request succeeded. Response: " + response);
    }
}
Response
- Status Code: 200 OK
Response Body
| Parameter | Type | Description |
|---|---|---|
| text | string | Text message sent by the model |
| audio | string | Base64 encoded audio file |
Example
HTTP/

1.1 200 OK

{
  "text": "My name is Chatbot.",
  "audio": "SGVsbG8gd29ybGQh"
}
Send Audio Message [POST]
Send an audio message in a chat conversation.
Request
- Endpoint:
/send/audio/<id> - Method:
POST - Content-Type:
multipart/form-data
URL Parameters
| Parameter | Type | Description |
|---|---|---|
| id | string | ID of the chat conversation to send the message in |
Request Body
| Parameter | Type | Description |
|---|---|---|
| audio | file | Audio file to send (multipart form data) |
Example
POST /send/audio/60c98731e3c1aa3eb4b57d9c

Content-Type: multipart/form-data

--boundary
Content-Disposition: form-data; name="audio"; filename="audio.wav"
Content-Type: audio/wav

<Binary audio data>
--boundary--
C# Sample
public void SendAudioMessage(string id, byte[] audioData)
{
    StartCoroutine(SendAudioMessageCoroutine(id, audioData));
}

private IEnumerator SendAudioMessageCoroutine(string id, byte[] audioData)
{
    string url = baseURL + "/send/audio/" + id;

    UnityWebRequest request = new UnityWebRequest(url, "POST");
    request.SetRequestHeader("Content-Type", "multipart/form-data");

    UploadHandlerRaw uploadHandler = new UploadHandlerRaw(audioData);
    request.uploadHandler = uploadHandler;

    yield return request.SendWebRequest();

    if (request.result != UnityWebRequest.Result.Success)
    {
        Debug.Log("Send audio message request failed: " + request.error);
    }
    else
    {
        string response = request.downloadHandler.text;
        Debug.Log("Send audio message request succeeded. Response: " + response);
    }
}
Response
- Status Code: 200 OK
Response Body
| Parameter | Type | Description |
|---|---|---|
| text | string | Text message sent by the model |
| audio | string | Base64 encoded audio file |
Example
HTTP/1.1 200 OK

{
  "text": "I received your audio message.",
  "audio": "SGVsbG8gd29ybGQh"
}
Reset Chat Conversation [POST]
Reset a chat conversation, removing all messages and audio.
Request
- Endpoint:
/reset/<id> - Method:
POST
URL Parameters
| Parameter | Type | Description |
|---|---|---|
| id | string | ID of the chat conversation to reset |
Example
POST /reset/60c98731e3c1aa3eb4b57d9c
C# Sample
public void ResetChat(string id)
{
    StartCoroutine(ResetChatCoroutine(id));
}

private IEnumerator ResetChatCoroutine(string id)
{
    string url = baseURL + "/reset/" + id;

    UnityWebRequest request = UnityWebRequest.Post(url, "");

    yield return request.SendWebRequest();

    if (request.result != UnityWebRequest.Result.Success)
    {
        Debug.Log("Reset chat request failed: " + request.error);
    }
    else
    {
        string response = request.downloadHandler.text;
        Debug.Log("Reset chat request succeeded. Response: " + response);
    }
}
Response
- Status Code: 200 OK
Response Body
| Parameter | Type | Description |
|---|---|---|
| messages | list | List of messages in the chat |
| roles | list | List of roles corresponding to messages |
| audio | list | List of audio files in the chat (base64 encoded) |
Example
HTTP/1.1 200 OK

{
  "messages": [],
  "roles": [],
  "audio": []
}
code repositories
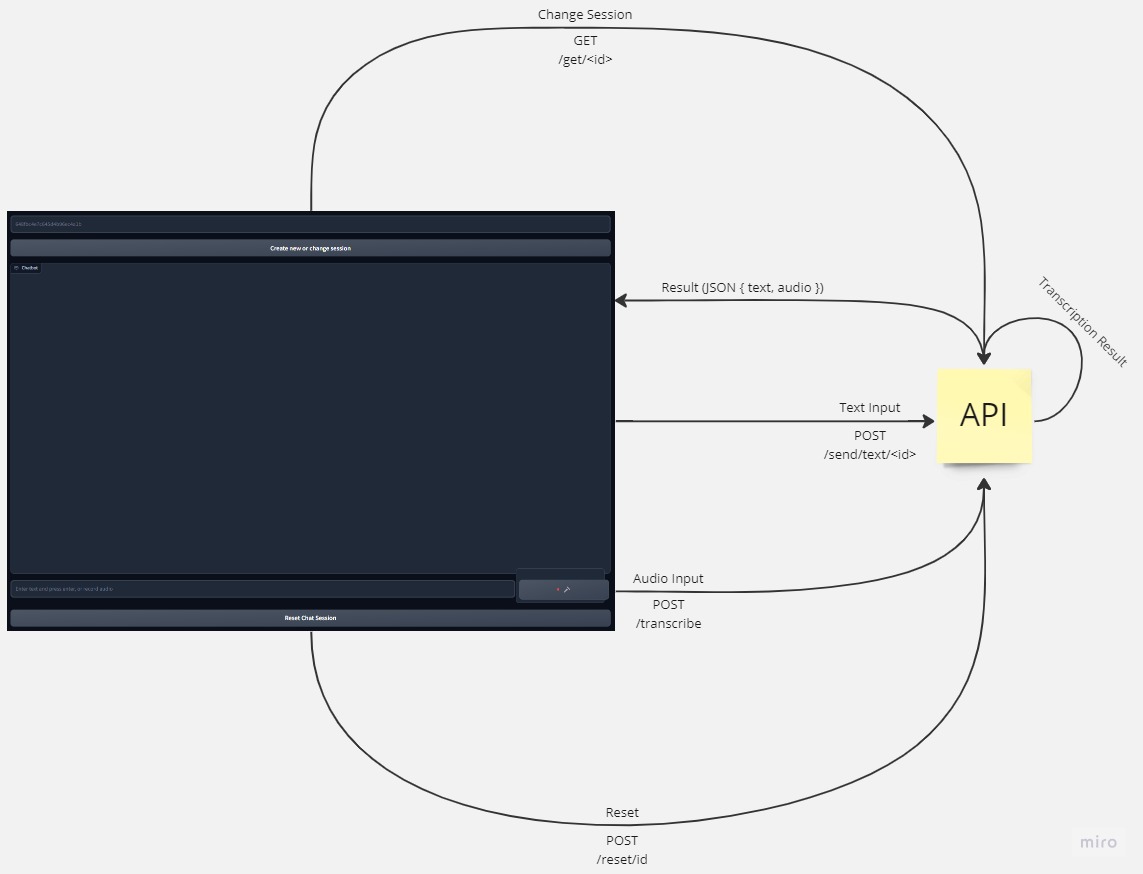
App Architecture
Swagger API page
Project Deployment Documentation
This document provides step-by-step instructions for deploying the API and application for the project. The deployment process consists of two parts: deploying the API and deploying the application.
Part 1: Deployment of API
Step 1: Pull the Repository
To begin with, you need to pull the repository from GitHub. Run the following command in your terminal:
git clone https://github.com/rifkybujana/Korean-Voice-QnA
Step 2: Install Requirements
Navigate to the cloned repository and install the required dependencies. Use the following command:
cd Korean-Voice-QnA
pip install -r requirements-min.txt
Step 3: Create Docker Connection
Next, create a Docker connection that will be used for running the MongoDB Docker image. Make sure you have Docker installed and running on your system.
docker network create mongo-network
Step 4: Run MongoDB Docker Image
With the Docker connection established, you can now run the MongoDB Docker image. Execute the following command:
docker run -d --network mongo-network --name mongodb -p 27017:27017 -d mongo
Step 5: Convert New Model
To convert a new model, you need to use the “ct2-transformers-converter” tool. Run the following command:
ct2-transformers-converter --model openai/whisper-large-v2 --output_dir model --copy_files tokenizer.json --quantization float16
Step 6: Add your OpenAI API key
Copy .env.example to .env by running:
cp .env.example .env
Edit the OPENAI_API_KEY environment variables inside the new file .env to your open ai API key.
NOTE: You can use vim or any other terminal text editor for this
Step 7: Build Docker Image
Build the Docker image for the API using the provided Dockerfile. Execute the following command:
docker build -t api-image .
Step 8: Run Docker Image
Finally, run the Docker image with the same connection as the MongoDB container. Use the following command:
docker run -it --rm --gpus all --name api-container -p 5000:5000 --network mongo-network api-image
The API is now deployed and accessible at http://localhost:5000 and http://
Part 2: Deployment of Application (If you want to deploy it OUTSIDE of huggingface space)
Step 1: Pull Hugging Face Space Repository
To deploy the application, you must pull the Hugging Face Space repository. Run the following command:
git clone https://huggingface.co/spaces/aiegoo/whisper-chatbot-ko
Step 2: Change the public API endpoint
Open app.py, and change the constant PUBLIC_API_ENDPOINT to your API URL address (make sure it’s already running).
Step 3: Run the Application
Navigate to the cloned repository and run the app.py file. Execute the following command:
cd whisper-chatbot-ko
python app.py
The application is now running and accessible.
NOTE: if you run it on a Linux server, run ufw allow 7860 to allow the port to be accessible
NOTE: you need to enable SSL for the app to access the user’s microphone
NOTE: to make the app run in the server’s background, use screen by running screen on your terminal, then just run the app.py
The following wiki, pages and posts are tagged with
| Title | Type | Excerpt |
|---|---|---|
| Weather app from firebase | post | Sunday-weather-app, open weather api |
| Exploring Jetson Nano in AIoT Applications | page | Jetson Nano serves as a potent platform for Edge AI applications, supporting popular frameworks like TensorFlow, PyTorch, and ONNX. Its compact form factor a... |
| 🔭sensor detection | page | RealSense with Open3D |
| AIOT Portfolio: From Edge AI to Autonomous Systems | page | A comprehensive showcase of my AIOT (AI + IoT) projects demonstrating the fusion of artificial intelligence with Internet of Things technologies. From autono... |
{# nothing on index to avoid visible raw text #}