- ardupilot doc
- Connecting the Flight controller and RPi Hardware
- Setting up the flight controller
- Configure the serial port (UART)
- Configure the Wifi
- Setup the RPi Software
- Connecting with the Mission Planner
- Example projects
ardupilot doc
.. _raspberry-pi-via-mavlink:
===========================================
Communicating with Raspberry Pi via MAVLink
===========================================

This page explains how to connect and configure a Raspberry Pi (RPi) so that it is able to communicate with a flight controller using the MAVLink protocol over a serial connection. This can be used to perform additional tasks such as image recognition which simply cannot be done by the flight controller due to the memory requirements for storing images.
Connecting the Flight controller and RPi Hardware
.. image:: ../images/RaspberryPi_Pixhawk_wiring1.jpg :target: ../_images/RaspberryPi_Pixhawk_wiring1.jpg
Connect the flight controller’s TELEM2 port to the RPi’s Ground, TX and RX pins as
shown in the image above. More details on the individual RPi’s pin
functions can be found
here <http://elinux.org/RPi_Low-level_peripherals>__.
The RPi can be powered by connecting +5V source to the +5V pin or from USB in.
Addon boards such as the Pi-Connect <https://www.rpanion.com/product/pi-connect-lite/>__
can simplify the connection of the RPi by providing a power supply and telemetry port.
.. tip::
Depending on the model of RPi used and internal/external peripherals used, +5V power requirements can vary from 80mA to close to 2.5A. The power budget for the particular system configuration should be assessed to determine the requirements for the +5V supply current. It is usually not recommended that +5v be supplied via the flight controller’s TELEM port connector.
.. _raspberry-pi-via-mavlink_setup_the_rpi:
Setting up the flight controller
Connect to the flight controller with a ground station (i.e. Mission Planner) and set the following parameters:
- :ref:
SERIAL2_PROTOCOL <copter:SERIAL2_PROTOCOL>= 2 (the default) to enable MAVLink 2 on the serial port. - :ref:
SERIAL2_BAUD <copter:SERIAL2_BAUD>= 921 so the flight controller can communicate with the RPi at 921600 baud. - :ref:
LOG_BACKEND_TYPE <copter:LOG_BACKEND_TYPE>= 3 if you are using APSync to stream the dataflash log files to the RPi
Configure the serial port (UART)
If not already configured, the Raspberry Pi’s serial port (UART) will need to be enabled. Use the Raspberry Pi configuration utility for this.
Type:
::
sudo raspi-config
And in the utility, select “Interfacing Options”:

.. figure:: ../images/RaspberryPi_Serial1.png :target: ../_images/RaspberryPi_Serial1.png
RasPiConfiguration Utility
And then “Serial”:

.. figure:: ../images/RaspberryPi_Serial2.png :target: ../_images/RaspberryPi_Serial2.png
When prompted, select no to “Would you like a login shell to be accessible over serial?”.
When prompted, select yes to “Would you like the serial port hardware to be enabled?”.
Reboot the Raspberry Pi when you are done.
The Raspberry Pi’s serial port will now be usable on /dev/serial0.
Configure the Wifi
If desired, the Raspberry Pi’s Wifi can be configured to create a
Wifi access point. This will allow other clients to connect to
the RPi and stream telemetry. See the official RPi documentation
<https://www.raspberrypi.org/documentation/configuration/wireless/access-point.md>__
for details.
.. tip::
The built-in Wifi on the Raspberry Pi does not have a large range. If range is an issue, consider a USB Wifi adapter with external antenna.
Setup the RPi Software
There are a few different software options for communicating with the flight controller. All use the MAVLink protocol for communication.
APSync
The easiest way to setup the RPi is to flash one of the existing :ref:APSync <apsync-intro> images:
- Purchase a formatted 8GB or 16GB SD card (16GB is better because some 8GB cards will not be quite large enough to fit the image) and insert into your laptop/desktop computer’s SD card slot
- Download the latest
image from firmware.ardupilot.org <https://firmware.ardupilot.org/Companion/apsync>__. Look for the file starting with “apsync-rpi”. - Use the
Etcher <https://www.balena.io/etcher/>__ software to load the image onto the micro SD card. -
Insert the micro SD card into into the Pi’s micro SD card slot
.. note::
There is a more recent APSync build for the RPi in the
forums <https://discuss.ardupilot.org/t/new-apsync-build-for-raspberry-pi/49528>__.
The APSync image will have the serial port (UART) already enabled.
MAVProxy
MAVProxy can be used to send commands to the flight controller from the Pi. It can also be used to route telemetry to other network endpoints.
This assumes you have a SSH connection to the Pi. If not, see see the
the RPi Documentation <https://www.raspberrypi.org/documentation/remote-access/ssh/>__.
See the :ref:MAVProxy Documentation<mavproxy:mavproxy-downloadinstalllinux> for install instructions
To test the RPi and flight controller are able to communicate with each other first ensure the RPi and flight controller are powered, then in a console on the RPi type:
::
python3 mavproxy.py --master=/dev/serial0 --baudrate 921600 --aircraft MyCopter
Once MAVProxy has started you should be able to type in the following
command to display the ARMING_CHECK parameters value
::
param show ARMING_CHECK
param set ARMING_CHECK 0
arm throttle 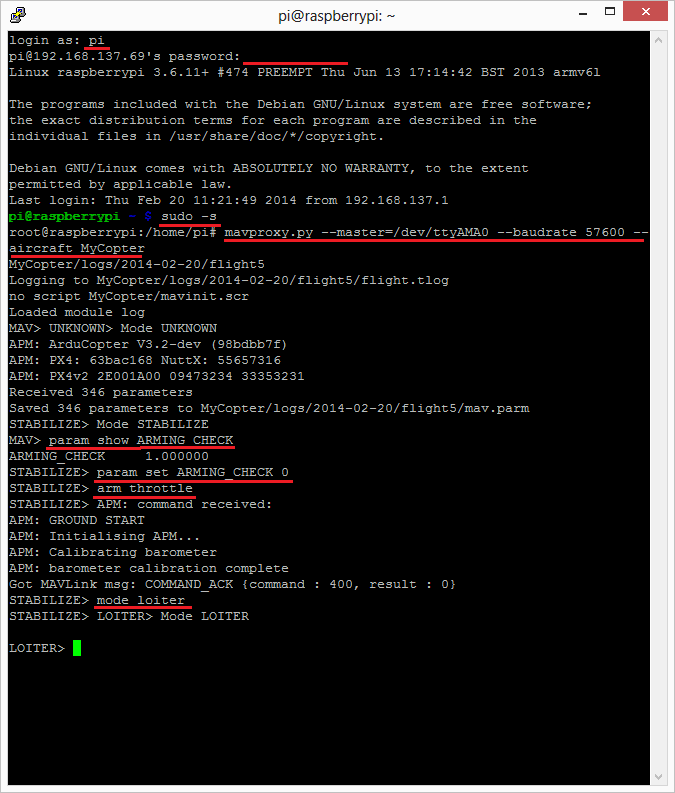
.. figure:: ../images/RaspberryPi_ArmTestThroughPutty.png :target: ../_images/RaspberryPi_ArmTestThroughPutty.png
.. note::
If you get an error about not being able to find log files or if this example otherwise doesn’t run properly, make sure that you haven’t accidentally assigned these files to another username, such as Root.
Mavlink-router
Mavlink-router is used to route telemetry between the RPi’s serial port
and any network endpoints. See the documentation <https://github.com/intel/mavlink-router>__
for install and running instructions.
After installing, edit the mavlink-router config file’s /etc/mavlink-router/main.conf
UART section to:
::
[UartEndpoint to_fc]
Device = /dev/serial0
Baud = 921600
You will also need to add an additional UDP endpoint allow other ground stations on the same
network to connect to the Pi. Edit the mavlink-router config file /etc/mavlink-router/main.conf
to include:
::
[UdpEndpoint to_14550_external]
Mode = eavesdropping
Address = 0.0.0.0
Port = 14550
PortLock = 0
DroneKit
The most up-to-date instructions for Installing DroneKit <https://dronekit-python.readthedocs.io/en/latest/guide/quick_start.html>__ on Linux are in the DroneKit-Python documentation.
Rpanion-server
Rpanion-server <https://www.docs.rpanion.com/software/rpanion-server>__ is
a web-based GUI for configuring flight controller telemetry, logging,
video streaming and network configuration.
Installation is via a disk image:
- Purchase a formatted 8GB (or larger) micro SD card and insert into your laptop/desktop computer’s SD card slot
- Download the latest
image <https://www.docs.rpanion.com/software/rpanion-server>__. - Use the
Etcher <https://www.balena.io/etcher/>__ software to load the image onto the micro SD card. - Insert the micro SD card into into the Pi’s micro SD card slot
The Rpanion-server image will have the serial port (UART) already enabled.
.. _raspberry-pi-via-mavlink_connecting_with_the_mission_planner:
Connecting with the Mission Planner
The flight controller will respond to MAVLink commands received through Telemetry
1 and Telemetry 2 ports (see image at top of this page) meaning that
both the RPi and the regular ground station (i.e. Mission planner, etc)
can be connected. In addition it is possible to connect the Mission
Planner to the MAVProxy application running on the RPi :ref:similar to how it is done for SITL <setting-up-sitl-on-windows_connecting_with_the_mission_planner>.
Primarily this means adding an --out <ipaddress>:14550 to the
MAVProxy startup command with the being the address of the PC running
the mission planner. On windows the ipconfig can be used to
determine that IP address. On the computer used to write this wiki page
the MAVProxy command became:
::
mavproxy.py --master=/dev/ttyAMA0 --baudrate 57600 --out 192.168.137.1:14550 --aircraft MyCopter
Connecting with the mission planner is shown below:

.. image:: ../images/RaspberryPi_MissionPlanner.jpg :target: ../_images/RaspberryPi_MissionPlanner.jpg
Example projects
FPV with raspberry Pi <https://diydrones.com/profiles/blogs/fpv-setup-with-raspberry-pi>__
Can’t get it to work? Try posting your question in the Companion Computer discussion board <https://discuss.ardupilot.org/c/apsync-companion-computers>__.
use case with fpv

After much chasing, and testing, I have found this to be an efficient way of getting low latency high quality HD video out of an Aircraft. The latency is around 0.4 seconds at worst which would be OK for an FPV with an APM doing the hard work.
I will continue to search for methods to drop the latency down further, but this is a lot better than the 6-12 seconds I was getting on my first attempts.
Any comment (with useful instructions) would be appreciated.
For the wireless link, I am using two UBIQUITY ROCKET M 900 with Australian ACMA approved firmware, at the base station, I am using a tracking (yet to built the tracker…) 1.5 meter long X and Y polarised Yagi, and on the plane, two RF Design flexible strip antennas, placed at right angles to each other.
but how you do that bit is up to you…..
the critical bit is getting the Raspberry Pi’s to chat to each other.
I have tried to make this as user friendly as possible… good luck.
Setting up IP video for Raspberry Pi 1080p video (FPV)
You will need 2 B model Raspberry Pi’s and 1 Pi Camera. (Element 14, or RS components)
Preparing your Raspberry Pi for first boot…
Follow the instructions at http://www.raspberrypi.org/wp-content/uploads/2012/04/quick-start-guide-v2_1.pdf
Install the prepared SD card in the Pi and boot.
Setting up your Pi Connect the Pi to your router with a network cable.
On Start-up it will resize the FAT partition and present you with a menu.
Set your language, and keyboard layout.
Select Raspbian… then click install.
After this has extracted (will take a while….) it will reboot into the configuration screen (again will take a while for this first boot.)
The important things to change here are
Enable the camera In advance options….. Set the host name (camera, for the camera end, receiver, for the viewing end) Memory split, set the memory for the GPU to 256 Enable SSH ( will come in handy later, as you may need to talk to the Pi in the air….. Then finish and reboot.
First login Username: pi
Password: raspberry
Setting up the required programs for video streaming
Install the dependencies by running the following in a terminal:
sudo apt-get install mplayer netcat
cd /opt/vc/src/hello_pi
make –C libs/ilclient
make –C libs/vgfont
cd /opt/vc/src/hello_pi/hello_video
make
cd ~
Now repeat this for the other Pi….
Streaming… First set up the receiver…. Ensure the receiver is connected to your network and run
ifconfig
after you press enter, you can find your ip Address. Note this down.
Then run the following.
mkfifo buffer
| nc -p 5001 -l > buffer | /opt/vc/src/hello_pi/hello_video/hello_video.bin buffer |
the Pi will now wait for the feed.
On the Camera Pi Ensure camera is connected to the Pi
Ensure Pi is connected to the network (you can confirm this with ifconfig)
(see instructions at http://www.raspberrypi.org/camera for how to connect the camera)
In the following command, replace the ip address with the one you just noted down.
| raspivid -t 0 -fps 15 -o - | nc 192.168.1.85 5001 |
if all goes well you should be streaming 1080P video at 15fps with less than 0.5seconds of delay..
now add your wireless bridge between the two, and away you go J
This information has come from the Raspberry Pi foundation website, and other sources, tested and proven by myself..
The following wiki, pages and posts are tagged with
| Title | Type | Excerpt |
|---|---|---|
| px4 mavlink and qgc integration with 4gremoteoperation | post | Tue, Jan 18, 22, powerful 3d simulation environment for autonomous robots suitable for testing object-avoidance and cv |
| Airlink by skydrone, youtube | post | Friday, airlink for mission flight, LTE connectivity and dl-ready |
| set up with raspi connected to fc | post | Tue, Jan 25, 22, ardupilot documentation |
| drone programming primer for software development | post | Mon, Jan 31, 22, flight stack with firmware middleware and api |
| runcam with fc connection | post | Tue, Feb 15, 22, runcam split 2 with fc |
| my new fixed wing AR Wing Pro, ready for dji HD fpv system | post | Thu, Feb 17, 22, setup guide after opening the package |
| realflight 7 setup and console game | post | Thu, Feb 24, 22, flight simulation with real flight 7 |
| uavmatrix's cast pro docs | post | Tue, Mar 01, 22, another way to integrate devices to gcs |
| firmtech7 of naver cafe raspi drone project | post | Thu, Mar 03, 22, using raspi as fc to control small drone |
| Garupner Polaron ex | post | Sun, Mar 06, 22, polaron 2 channels dc charger |
| svg visualization messages and parameters | post | Mon, Mar 07, 22, organized structure and tree map of px4 messages and parameters |
| lx network, airlink, gcs and data transmission on smart radio, rf mesh and quantum encryption | post | Tue, Apr 26, 22, all about setup and how it operates and managed |
| rflysim tltr | page | |
| drones.md | page | my drones I work with and at my disposal. |
| my 100 supporters | page | my freelancers I work with since 2018. |
| index.md | page | My recent projects are leveraging generative AI across various domains, yielding significant achievements. These encompass Digital Twin, Voice-to-Command, RA... |
| About this site and its author | portfolio | My portofolio site and its mission statement |
| 🔭AIOT projects | page | summary. |
| contents deploy automation | page | Pilot test on the automation prototype. |
| pixhawk apm racing drone | page | summary. |
| Challenger Engineering Project | page | summary. |
| pixhawk tools | page | rFlyeval project details where Matlab Mathwor Simulink were used for complete process of UAV and UAS. |
| Korea drone companies | page | summary. |
| Racing drone, attck drone | page | summary. |
| Django Django Two scoops | page | summary. |
| docker learning curve | page | summary. |
| 🔭 Ground Control Station web-based approach | page | summary. |
| gitlab | page | summary. |
| 🔭lora monitoring app | page | summary. |
| 🔭 MQTT pages | page | summary. |
| My course list | page | my course list from udemy, udacity, NCS and other sources |
| Nextcloud | page | summary. |
| Automation pipeline | page | summary. |
| Pixhawk 4 | page | summary. |
| Pixhawk overview | page | summary. |
| 🔭yuneec realsense obstacle avoidance | page | summary. |
| ROS topic for micro control | page | summary. |
| 🔭 RQt-based gui | page | summary. |
| 🔭sensor detection | page | RealSense with Open3D |
| 🔭Serializer with API | page | summary. |
| Rules of thumb | page | Contact me for any support issues. |
| web-dev ops pages | page | |
| 🔭 Webrtc | page | summary. |
| pixhawk tools advanced | page | rFlyeval project details where Matlab Mathwork Simulink were used for complete process of UAV and UAS. |
| pixhawk tools | page | rFlyeval project details where Matlab Mathwor Simulink were used for complete process of UAV and UAS. |
| Bebop Drone Autonomy: ROS-based Flight Control and Hardware Modifications | post | Deep dive into Parrot Bebop drone modifications and autonomous flight control using ROS. Includes hardware modifications, UART connections, and custom flight... |
{# nothing on index to avoid visible raw text #}