- summing up
- Installation
- How does it work?
- Hardware
- Flight Controllers
- Supported Raspberry Pi boards
- Power supply
- Modem
- Camera
- Cockpit
- Dashboard
- Flight Controller
- GroundControl
- Cell Modem
- DNS
- VPN
- Application
- configuration
- http videostream
- Diagnostic
- Network
- LED
- application update
- Rest API
- FAQ
- Do i need a LTE modem?
- Not able to open web interface
- Where can i download latest version?
- Cannot activate UAVcast-Pro license
- Installation validation fails.
- Im not able to receive video or telemetry
- No Mavlink Heartbeats received in UAVcast-Pro
- Cant receive video, but telemetry works
- Other Application issues.
- Zerotier VPN
summing up
interface
Just preparing for the meeting here :)
- installation with RASPI images
- Installation
- Dashboard
- GroundControl
- Network manager
- Application
-
overview 클라우드형 GCS는 자체 설치 과정은 생략되지만 GCS와 연동하게 하는 컴패니언 컴퓨터(raspberry pi)이미지는 제공 되어야 함. (이부분에 대한 개발은 별도로 진행 요구됨) Web-based GCS can offer the easiest method of deploying GCS across the platform, without a need for personal installation of GCS instance. Howerever, providing an Raspbian installation USB stick with customized interface is necessary and recommended.
특히 FC와 라즈베리 파이 연결, 카메라 연결, 네트워크 구성을 위한 튜토리얼과 동영상 제작도 필요하고, 필요에 따라서는 이를 편리하게 할 수 있는 Configuration 파일을 통해 개별적 상황을 반영 할 수 있도록 프로그램을 개발을 해야 함. Many will find it difficult to create a network interface and phyical connection between raspberry pi and FC. For convenience and hassle-free setup of this, tutorial wikis and videos should be available upon release of the prodcuct.
-
Dashboard 대쉬보드는 사전에 정의 된 사용자의 등급 또는 역활에 맞는 두가지 형태의 클라이언트 대쉬보드와 회사용 어드민 대쉬보드로 구별하여 제작하며 각 역활에 맞는 전반적인 상태와 기록등을 관리할 수 있도록 하는 데 목적이 있다.
Installation
Start with a fresh Raspberry image. Confirmed working images:
!!! warning “Bullseye release”
Raspberry organisation just released (01.11.2021) new bullseye image wich is not yet compatible with UAVcast.
Please use the previous buster releases from the links bellow:
!!! note “Looking for other boards!”Development objectives !!! note “Looking for other boards!” We are currently building UAVcast-Pro for other architectures and OS. Check out our beta section
See the https://www.raspberrypi.org/software/operating-systems/ for installation instruction.
Continue to install UAVcast-Pro as described in the installation section
UAVcast-Pro installation
You can install the latest version of UAVcast-Pro by pasting this command into you RPI shell.
curl -s http://install.uavmatrix.com | sudo bash
After the installation there will be validating proccess to verify that all component has been loaded successfully. You can now access the webinterface using the RPI ip or Host name address in your browser. http://raspberrypi/
Navio Flight Controller
For Navio+ and Navio2 boards, please use the installation procedure below:
- Install the latest image provided by https://emlid.com.
- Connect to your RPI with SSH and run the emlidtool as described in the emlid documentation.https://docs.emlid.com/navio2/common/ardupilot/installation-and-running/#choosing-a-vehicle-version-and-board
- Select your vehicle, version and frame.
- On Boot Select disable
- Ardupilot Select stop
- Apply and exit.
-
Install UAVcast-Pro as described uavcast-pro-installation


How does it work?
UAVcast-Pro is an application that provides an easier method for streaming mavlink (telemetry) data and video over a defined network. It will connect to the Flight Controller using mavlink protocol and proxy these packages to a destination of your choice.
The behaviour is exactly the same as when using regular telemetry module, there is no limitaion using UAVcast-Pro.
UAVcast-Pro will use the default network connection for streaming, and by using uavnet, the connection will also be secure. Uavnet is a vpn built on the zerotier controller and provides secure peer to peer conectivity.
The application is hosted locally on your device, and there is no communication to a 3rd party!
Hardware
TL;DR
You will need a raspbery pi and a mavlink flight controller to get going. You dont need a modem for testing locally in your home network, a local wifi or ethernet connection will work just fine. As soon as you have configured everything and are ready to go flying, you need a modem, we recommend a HiLink (Plug and Play) type.
If you want to control your drone manually during flight, we also recommend using a USB gamepad connected to Mission Planner joystick integration.
See more info bellow.
Flight Controllers
All Mavlink based boards are supported (PX4, Ardupilot).
The Ardupilot project is often adding support for other flight controllers. The full list of supported flight controllers can be viewed here http://ardupilot.org/plane/docs/common-autopilots.html.
To mention some supported board:
- Pixhawk
- APMx
- Cube
- Matek
- Navio+
- Navio2
Connection Methods
There is two ways to connect the FC to Raspberry PI, either using USB (preferred) or GPIO There is no diffrence in performance but the USB connection is easier and more elegant.
USB
- Connect a micro USB cable between the FC and RPI as shown in the picture bellow.
!!! warning “USB cross-sectional”
Use a USB cable with large cross-sectional area to minimize the voltage drop supplied to Fligth Controller.


GPIO
- Its very imporant to connect tx, rx and ground if you want to use GPIO, and not only tx & rx.
!!! warning
RPI cannot be powered by FC telem port. [Make sure you use proper power source for rpi.](/hardware/#power-supply)


Supported Raspberry Pi boards
- Pi0w
- PI 2
- Pi 3
- Pi 4
!!! warning “Pi0w”
Pi0w runs fine with UAVcast-Pro, however the CPU usage will be between 50 > 100%.<br>
Some functionalities has been disabled to reduce the CPU load!
If you intend to use other programs with UAVcast-Pro, then Pi3 or 4 version is recommended.
Power supply
It’s important that Raspberry Pi gets voltage between 4.8 and 5.3v. If you use LTE modem, make sure you are not overloading the USB port per. design.
Read the modem specification / datasheet and make sure the modem is not consuming more than MAX output defined in the table below.
!!! info “USB Camera”
If you use USB camera, make sure you include the camera consumption as well.
https://www.raspberrypi.org/documentation/hardware/raspberrypi/power/README.md
-
Limited by PSU referes the value from the (Recommended PSU current capacity). Make sure you use a proper power supply that are able to deliver above this value.


If you need to add external power, please see instructions bellow. This is one solution, where we attach the power directly to the USB +/- pins, and one wire to the RPI fuse. The latter will make sure RPI is booting automatically when powered.
!!! note
Make sure you connect the modem to correct USB port where external power supply is connected.


Modem
UAVcast uses modem manager and network manager to control the LTE connection. Check out this page to find supported modems, Supported modem
Recommended Huawei HiLink modems by Countries
!!!note
Please send a mail to **[email protected]** or open a new PR on [github](https://github.com/UAVmatrix/uavcast-pro-docs) if you know of other working Huawei modems in your country!
| Country | Carrier | Recommended Modem | Recommended APN |
|---|---|---|---|
| Australia | Telstra | E3372h-153 E3372h-607 |
telstra.wap telstra.internet |
| Austria | bob A1 Telekom Austria | E3372h-153 E3372h-607 |
bob.at |
| Bulgaria | Vivacom | E3372h-153 E3372h-607 |
internet.vivacom.bg |
| Czech Republic | O2 | E3372h-153 E3372h-607 |
internet |
| Czech Republic | Vodafone | E3372h-153 E3372h-607 |
internet |
| France | Bouygues | E3372h-153 E3372h-607 |
mmsbouygtel.com |
| France | Orange | E3372h-153 E3372h-607 |
orange.fr / orange |
| France | SFR | E3372h-153 E3372h-607 |
websfr |
| Germany | T-Mobile | E3372h-153 E3372h-607 |
internet.t-d1.de |
| Germany | O2 | E3372h-153 E3372h-607 |
internet |
| Germany | Vodafone | E3372h-153 E3372h-607 |
web.vodafone.de |
| Greece | Cosmote | E3372h-153 E3372h-607 |
internet |
| Greece | WIND Hellas | E3372h-153 E3372h-607 |
gint.b-online.gr |
| Hungary | Magyar Telekom | E3372h-153 E3372h-607 |
internet.telekom |
| Italy | Iliad | E3372h-153 E3372h-607 |
iliad |
| Italy | TIM | E3372h-153 E3372h-607 |
ibox.tim.it |
| Italy | Vodafone | E3372h-153 E3372h-607 |
web.omnitel.it |
| Latvia | Tele2 | E3372h-153 E3372h-607 |
mobileinternet.tele2.lv |
| Malaysia | DiGi | E3372h-153 E3372h-607 |
diginet |
| Netherlands | T-Mobile | E3372h-153 E3372h-607 |
internet |
| Norway | Telenor | E3372h-153 E3372h-607 |
internet.public / internet |
| Poland | Orange | E3372h-153 E3372h-607 |
internet |
| Portugal | Vodafone | E3372h-153 E3372h-607 |
internet.vodafone.pt |
| Singapore | Singtel | E3372h-153 E3372h-607 |
e-ideas |
| Singapore | StarHub | E3372h-153 E3372h-607 |
shwap |
| Spain | Movistar | E3372h-153 E3372h-607 |
movistar.es |
| Spain | Yoigo | E3372h-153 E3372h-607 |
internet |
| Sweden | Halebop | E3372h-153 E3372h-607 |
halebop.telia.se |
| Sweden | Tele2 | E3372h-153 E3372h-607 |
4G.tele2.se |
| Sweden | Telenor | E3372h-153 E3372h-607 |
internet.telenor.se |
| Sweden | Telia | E3372h-153 E3372h-607 |
online.telia.se |
| Switzerland | Salt | E3372h-153 E3372h-607 |
internet |
| Switzerland | Sunrise | E3372h-153 E3372h-607 |
internet |
| Switzerland | Swisscom | E3372h-153 E3372h-607 |
gprs.swisscom.ch |
| Switzerland | Swisscom | E3372h-153 E3372h-607 |
corporate.swisscom.ch APN User: testprofil and APN Password: temporary |
| Turkey | Turkcell | E3372h-153 E3372h-607 |
mgb / internet |
| UK | EE | E3372h-153 E3372h-607 |
everywhere |
| USA | AT&T | E3372h-510 | various |
| USA | Sprint | No info | No Info |
| USA | T-Mobile | E3372h-510 E3276s-505 MS2372h-517 |
fast.t-mobile.com, epc.tmobile.com |
| USA | Verizon | E3372h-510 | vzwinternet |
!!!success “Modem LED Status”
- Green, flashing twice every 2s: The USB-Modem is powered on.
- Green, flashing once every 0.2s: The software of the USB-Modem is being upgraded.
- Green, flashing once every 2s: The USB-Modem is registering with a 2G network.
- Blue, flashing once every 2s: The USB-Modem is registering with a 3G network.
- Cyan, flashing once every 2s: The USB-Modem is registering with a 4G network.
- Green, solid: The USB-Modem is connected to a 2G network.
- Blue, solid: The USB-Modem is connected to a 3G network.
- Cyan, solid: The USB-Modem is connected to a 4G network.
HiLink or Stick modems
Some Huawei USB modems have a mode called “HiLink” which provides for “driverless” installation on Windows, Macintosh and Linux computers. These modems usually have the HiLink logo marked on the outside, or have letter H in the model name. Example E3372H. All modems in the table above is HiLink!
Stick modems is a regular modem where you need to send AT commands to establish a cell connection. UAVcast has all the connection stuff you need integrate a stick modem.
HiLink Advantages
The big advantages being that the connection time is very fast and hassle free. A HiLink modem uses a web browser to access the modem settings.
It acts more or less like a plug and play modem, you don’t need to configure any parameters in UAVcast-Pro or Raspberry Pi.
HiLink Disadvantages
Hilink modems does not support Port Forwarding out of the box. You certainly almost every-time need to flash new firmware to access the Port Forwarding menu in the modem web interface.
However, if you use VPN connection then HiLink is a perfect choice as VPN does’t not require any port forwarding.
Camera
There are several cameras that works with UAVcast-Pro, such as:
- PiCam
- Logitech C920
- Logitech C615
-
GoPro. (Can be used with HDMI to CSI converter). This allows users to record and view live stream simultaneously.


-
Supported GoPro cams:
- HERO7 Black
- HERO (2018)
- HERO6 Black
- HERO5 Black
- HERO4 (Black and Silver Editions)
- HERO3+ (Black and Silver Editions)
- HERO3 (White, Silver, and Black Editions)
- HERO2)
- GoPro example video from one of our users.
- Other cameras may also work. search for (camera type) and gStreamer.
Mission Planner and QGroundControl supports video stream by default on port 5600.
Cockpit
Cockpit gives you a nice overview of your vechile position with mavlink telemetry data. Some basic commands can be triggered within the map.
You can select how fast the update intervall should be between your flight controller and map from 1 - 5 Hz. It’s recommended to lower the interval if you use PiZero due to the limited resources.


In browser video
You are able to receive live video feed from your picam within the map. The video container can be scaled and positioned / dragged anywhere in the window.
Telemetry
Cockpit gives you live telemtry data listed on the left hand side.
Commands
You can send some basic commands from the map such as enable GCS failsafe, trigger RTL, Loiter, Pre-flight check and show your missions.
Dashboard


Dashboard provides a overview of the current casting status and Raspberry Pi internal memory and storage. There is one LED for each item you have enabled in the menu, displaying green or red status of its current operating state.


Start / Stop UAVcast-Pro
You can start and stop UAVcast-Pro from the dashboard. This will simulate the exact start up sequence when Raspberry Pi boots up (if autoboot is enabled). If you get all green led’s then all selected items have started as expected.
This is a nice way to verify that UAVcast-Pro will start as expected when Raspberry Pi starts up.


Enable / Disable Autostart
If autostart is enable, then UAVcast-Pro will start all enabled functions every time Raspberry Pi boots up.
CPU
Under-voltage detection, CPU throttling and temperature is shown on the dashboard. When an under-voltage or CPU throttling is detected these icons will turn from green to red.


!!! warning It is recommended to use a stable 5v power supply for the Raspberry Pi, this can be achieved using a UBEC or similar. It is not recommended to power your Raspberry Pi from the servo rail as voltage drop can occur.
Network Statistics
You are able to view network statistics from the dashboard for all network adapters that have been configured - These stats update every 10 seconds.


Storage / Memory
 Overview of free space and used memory

Flight Controller


Configure the connection between Raspberry and the Flight Controller.
Controller Type
- Default value:
None - Options:
Ardupilot, Navio
Choose the board you want to use. for Pixhawk, APM, Cube or other Ardupilot variants select Ardupilot.
Vehicle (Navio Only)
- Options:
ArduPlane, ArduRover, ArduCopter
Select the binary you want use.
Connection Method
-
Options:
USB, GPIOSelect the communcation method you use
Baud rate
- Default value:
57600 - Options:
9600, 57600, 115200
Select a baud rate you want to use for the telemetry stream.
Protocol
- Default value:
TCP - Options:
TCP, UDP
Select the protocol you want to use for the telemetry stream.
FC Internal Address
- Default value: USB
/dev/ttyACM0, GPIO:/dev/ttyAMA0
This is the internal address raspberry uses for communication with Flight Controller. Only change if you know what you are doing!
Validate Mavlink Connection
Check if raspberry Pi receives mavlink messages from your FlightController. This is usefull when troubleshooting. UAVcast will check if valid HEARTBEAT message is received on the selected connection method above. Its recommended to run this test after a reboot
Success


Failed


GroundControl


Add Telemetry and video destination end-points. You can add as many end points you want.
!!! info Destinations only applies if you have selected UDP protocol for telemetry or video.
Enable / Disable switch##
You can choose which end-points should be enabled. Convenient if you want to save a destination for later usage.
Name
Set a unique name for you destination.
UDP Host
Destination (GCS) IP or DNS name. (UAVcast-Pro will stream telemetry or video towards this end-point)
Telem Port
- Options:
0 - 65536
Port you want to use for telemetry. Default is 14550.
Video Port
- Options:
0 - 65536
Port you want to use for video. Default is 5600. Mission planner and QGroundControl supports video on port 5600 by default.
Enable / Disable Telemetry switch
Enable or disable telemetry for each end-point.
Enable / Disable Video switch
Enable or disable video for each end-point. Only one video destination allowed.
Cell Modem


!!! warning Do not enable modem in UAVcast if you are using HiLink modem. These modems uses embedded connection software.
Make sure you are using a supported modem https://www.freedesktop.org/wiki/Software/ModemManager/SupportedDevices/
E3372S or E3372H, has proven to be a good modem for these types of application.
Model
- Options:
Stick, HiLink
Select if your modem is in stick or Hilink mode. Read the end character in the model name. Example: E3276H is a Hilink and E3276S is a stick modem. Read more on HiLink and Stick modems here Hardware/modem
Use Modem Manager
- Default value:
No
UAVcast uses Network Manager to create the GSM connection provided by Modem Manager. However, on some modems this wont work. This option force the connection to be established by Modem Manager only. It’s recommended to restart RPI if you change this option.
Interface
- Default value:
- RPI 2/3: Hilink:
eth1, Stick:wwan0 - RPI Pi0w: Hilink:
eth0, Stick:wwan0
- RPI 2/3: Hilink:
Set the Stick or Hilink modem interface name.
LED will turn green if the interface has proper internet access.
Access Point Name (APN)
- Default value:
internet
This value is operator specific. If you don’t know yours, then contact your cell operator and ask for a proper APN name. Operators normally have several different APN names. You can find more information here https://en.wikipedia.org/wiki/Access_Point_Name
Modem Address
- Default value:
cdc-wdm0
This is the intenral address for your USB modem, and in most cases cdc-wdm0
However, some modems uses different address. If the above don’t work, then you could try ttyUSB0 or ttyUSB1
Username
- Default value:
blank
Most carriers don’t require any username or password, but some might. This is operator specific. Contact your cell operator and ask for username if you encounter any issues.
Password
- Default value:
blank
Most carriers don’t require any username or password, but some might. This is operator specific. Contact your cell operator and ask for Password if you encounter any issues.
Pin
- Default value:
blank
Your simcard Pin Code. It’s recommended to disable the pin to get faster connection on startup.
ModemInformation


You will be able to see general information from your modem. This will only work for some Huawei modems.
Validate Connection
When all parameters are correctly set, then press the connect button to test the connection.


DNS


!!! Info If you are connected using VPN, then DNS is not needed. VPN connections uses static IP address that wont change.
Dynamic DNS allow you to bind an external IP address to a convenient name so we humans can easily remember. The name (Alias) will always be pointing towards the external IP address even though if the IP changes.
As an example, www.google.com is pointing towards 172.217.21.142, if you type that IP address in your browser you will still access the google.com, but those numbers would be hard to remember, hence the name is more convenient.
Here is a list for UAVcast supported services. Use any of the bellow services and add the name to the DNS System input.
- For dyndns.org: [email protected]
- For freedns.afraid.org: [email protected]
- For zoneedit.com: [email protected]
- For no-ip.com: [email protected]
- For easydns.com: [email protected]
- For tzo.com: [email protected]
- For 3322.org: [email protected]
- For dnsomatic.com: [email protected]
- For tunnelbroker.net: [email protected]
- For dns.he.net: [email protected]
- For dynsip.org: [email protected]
- For sitelutions.com: [email protected]
- For dnsexit.com: [email protected]
- For generic: custom@http_svr_basic_auth
Username
Your service username. This is normally the credentials for logging in to your account at (example no-ip.com)
Password
Your service password. This is normally the credentials for logging in to your account at (example no-ip.com)
Alias
This is your newly created address or name. example: uavcast.no-ip.info
DNS System
This is the system or service you are using from the list above. If you have signed up for no-ip.com, then use [email protected].
VPN
UAVcast currently supports Zerotier and OpenVPN without the need for any additional software running on the Raspberry Pi.
VPN page Overview


Zerotier
Zerotier establishes a direct connection between the connected devices, even if they are behind a NAT.
!!! note Depending on your cellular providers NAT policy - if you are having issues with video streaming over UDP, try using a TCP for your connections or try OpenVPN.
OpenVPN
OpenVPN connects devices togheter using server in-the-middle principle. Many cloud services has prebuildt servers with openvpn for easy startup.
When you have started your vpn access server, login and add a user / client. For the user you want to asign to UAVcast, make sure you have ticked the auto-login box.


Now, login with your newly created user https://your_openvpn_ip:943/
Download the (Yourself- Autologin profile)


Drag this file into UAVcast-Pro => vpn page and hit connect.
For more information about setting up OpenVPN, please see the Open VPN Wiki.
Application


Dark Theme
Dark mode can be enabled from the settings page.
Server messages
This will allow UAVcast to populate a notification card when server notice an error.
Messages:
- Power (undervoltage detection)
- CPU throttling due to undervoltage or high load.
Server Port
You are able to change the access port for UAVcast-Pro from the default port of 80.
Reset Logfiles
Each function in UAVcast stores all operations to logfiles, and to start on a fresh file you can reset them here.
Reset Database
Delete all configuration you have made in UAVcast-Pro. User data will NOT be deleted!
Alternate Languages
Select a prefered lanuage.
- English
- Simplified Chinese
- Turkish
- Spanish
- Russian
- Polish
- Dutch
- Italien
- Portuguese
If you would like to contribute to UAVcast-Pro by adding a new language, please follow the instructions here.
Updates
UAVcast is regularly updated, to check if there are any updates available for your installation click the “Check for Update” button.


!!! note Once an update has been completed - please refresh your browser.
configuration


UAVcast-Pro uses the well known media-handling library gstreamer to proccess the video pipeline towards the Ground Control Station. It supports PiCam, Logitech C615, Logitech C920 out of the box.
!!! info
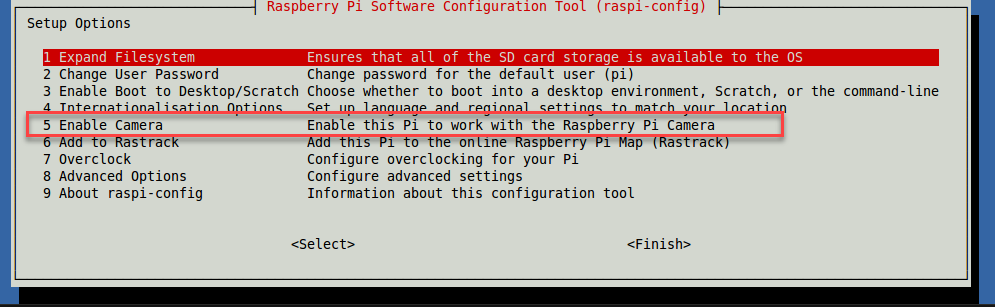
Remember to activate camera in Raspberry Config if you are using PiCam.
`sudo raspi-config`
Camera Type
- Options:
PiCam HTTP, PiCam TCP/UDP, C615, C920, Custom Pipeline
Each camera uses different start code, also known as pipeline to be able to communicate or process the video source. UAVcast-Pro has three diffrent cameras pre-defined from the dropdown menu. However, if your camera is not listed then you can insert a custom pipline with the needed plugins to match your current camera model and type.
You can also send a test video by inserting the pipeline below to UAVcast-Pro custom field section, nice way to check if everything is working without the camera itself.
Remember to change the Destination address:
gst-launch-1.0 videotestsrc ! x264enc ! video/x-h264, stream-format=byte-stream ! rtph264pay ! udpsink host=GCS_ADDRESS port=5600
Take a look at this page for pipeline examples http://wiki.oz9aec.net/index.php/Gstreamer_cheat_sheet
UDP / TCP / HTTP protocol
- Default value:
UDP
UAVcast-Pro supports UDP, TCP and HTTP live in-browser viewer for PiCam, other cameras only support UDP at the moment. Multiple users may view live video using the HTTP protocol.
GCS Destination
All destinations you have added in Ground Control page will be shown in the dropdown list. It is only possible to select one destination for video.
Video resolution
- Default value:
240p (320x240) - Options:
240p (320x240), 480p (720x480), 540p (960x540), HD (1280x720), Full HD (1920x1080)
!!! tip
If your broadband connection has a low transfer speed, then lower the resolution to get smooth video.
Destination Port
- Default value:
5600
Change the Video network port. Mission Planner and QGroundControl supports video in HUD by default on port 5600.
Bitrate
- Default value:
2000000
Change the Bitrate value.
!!! tip
If your broadband connection has a low transfer speed, then lower the Bitrate to get smooth video.

Example: `800000`
Frames Pr.second
- Default value:
20
Change the FPS value.
!!! tip
If your broadband connection has a low transfer speed, then lower the FPS to get smooth video.

Example: `8`
Start Video Stream
To verify if camera will start properly, simply press the start button. If any issues, press the Log button to reveal any problems.


##Receive UDP video (Windows / Mac / Linux / Android)
Ubuntu
If you’re going to stream to a Ubuntu PC, install the some packages locally beforehand.
sudo apt-get update
sudo apt-get install gstreamer1.0-tools gstreamer1.0-plugins-good gstreamer1.0-plugins-bad
Android
-
Download and install QGroundControl for Android.
-
Find IP address of your device in preferences. You’ll need it in order to connect to the phone from your RPi.
-
Run QGroundControl and it will automatically detect your vehicle.
Note: default port for video in QGC application is 5600
Here’s the app in action


Mac OS X
The simplest way is to use brew. To install it run the following in your Mac terminal:
ruby -e "$(curl -fsSL https://raw.githubusercontent.com/Homebrew/install/master/install)"
brew update
brew install gstreamer gst-libav gst-plugins-ugly gst-plugins-base gst-plugins-bad gst-plugins-good
Windows
Solution #1
Download and install Mission Planner or QGroundControl both applications supports UDP video by default on port 5600 without any extra configuration. Start camera in UAVcast-Pro and open MP or QGC
!!! warning “Streaming over VPN may cause poor video quality in MP and QGC”
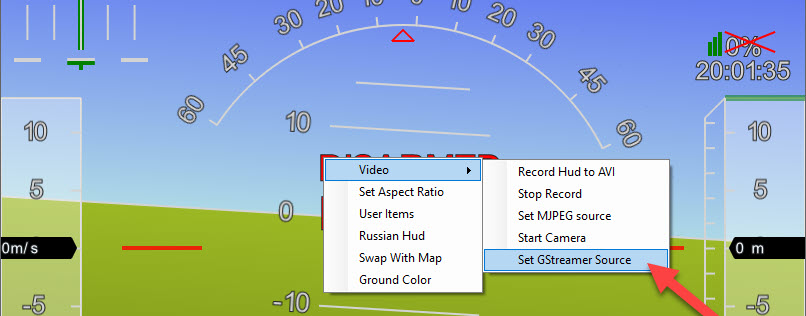
If you experience issues when streaming by VPN, such as **pixalating frames** or **grey overlay** then change the gstreamer source in Mission Planner HUD, with this pipeline:
```
udpsrc port=5601 caps = "application/x-rtp, media=video, clock-rate=90000, encoding-name=H264, payload=96" ! rtpjitterbuffer ! rtph264depay ! avdec_h264 ! videoconvert ! video/x-raw,format=BGRA ! appsink name=outsink
```
**NOTE!**
Mission Planner always starts its default gstreamer pipeline and listen on default port 5600, when using the custom source above we need to use a diffrent port so it wont make any conflicts. In this example we use **port 5601**. Remember set port [5601](http://docs.uavmatrix.com/pages/Camera/#destination-port) in UAVcast-Pro as well!
Solution #2
Download and install gstreamer for Windows.
Open a new command-prompt window and navigate to the gstreamer bin folder, usually C:\gstreamer\1.0\x86_64\bin
Start gstreamer For Windows/Ubuntu/Mac OS X:
Paste this gstreamer command in the command-prompt(windows) or terminal (unix/mac) to start gstreamer.
gst-launch-1.0 -v udpsrc port=5600 caps="application/x-rtp, media=(string)video, clock-rate=(int)90000, encoding-name=(string)H264" ! rtpjitterbuffer ! rtph264depay ! avdec_h264 ! videoconvert ! autovideosink sync=false
From now on, your computer will be waiting for the input stream from Raspberry PI. Once it gets a stream, you’ll see the real-time video from your drone.
TCP video (Windows / Mac / Linux)
Select TCP from the dropdown menu in UAVcast-Pro web interface. Add your raspberry IP address (if you use Zerotier VPN, add ZT IP address) in the TCP Host input box.
Press Start camera button. You should see video started successfully
Install gstreamer for your operating system (see above section), then open a new command-prompt(windows) or terminal(unix/mac)
Paste this gstreamer command in the command-prompt(windows) or terminal (unix/mac) to start gstreamer.
!!! info
Windows users needs to navigate to gstreamer folder before using the below gstreamer command.
You need to change the PI_IP to the same as you used for TCP Host
gst-launch-1.0 -v tcpclientsrc host=PI_IP port=5600 ! gdpdepay ! rtph264depay ! avdec_h264 ! videoconvert ! autovideosink sync=false
From now on, your computer will be connecting towards Raspberry PI. Once it gets a stream, you’ll see the real-time video from your drone.
Startup help files (Windows)
It’s possible to save the gstreamer pipline to a .cmd file, then you can just double click the file and video will start automatically.
Download files below, then right click and select edit. Change the port number or path of gstreamer if necessary.
http videostream


!!! info Doubleclick the video frame to view fullscreen. PiCamera can be viewed live in Browser instead of streaming to Ground Station. Keep in mind that quality and resolution will be lower than normal UDP / TCP streaming.
Start Stream
Start fetching stream from PiCamera
Stop Stream
Stop Streaming
Diagnostic


You have multiple options to diagnose your raspberry pi from this page.
Shutdown
This will shutdown the Raspberry Pi
Reboot
Reboot your Raspberry Pi
USB Devices
Will list all connected USB devices.
Kernel Messages
Will populate the kernel log
Network
Will populate all network interfaces. (ifconfig)
SpeedTest
Will test your upload and download broadband speed.
Processes
Will list all active running processes
Custom Terminal
You can interact with your Raspberry using the custom terminal window. You can type what ever you normally would from the shell window.
Network


Take full control over your raspberry pi network configuration.
Hostname
Set your prefered raspberry hostname. Default is raspberrypi
You can access your raspberry using the hostname instead of ip address.
Example, try open your browser and type raspberrypi/ as the URL
Network Route
Specify the default network route from the dropdown menu. Raspberry pi will try to use the selected device for accessing outer world. Only physical devices can be selected, not VPN or other bridged interface. Raspberry will still be able to use other interfaces, but priority the one you select.
WiFi network
You can search and connect wifi network from within UAVcast-Pro.
Interfaces
Will populate all interfaces and show the current configuration, such as IP, Netmask, Gateway and if you want to enable/disable IPv6. Box with green outline is your default connection to the outer world. Do not change any values while in flight, this might disconnect you from the vehicle.
LED


!!! warning This function is disabled on PiZero board.
##OnBoard Status LED You can customize the onboard Status LED to light up when a certain function within UAVcast has started.
Such as:
- UAVcast has started
- Modem has established internet connection.
- VPN connection established
- Undervoltage Detected
##OnBoard Power LED You can customize the onboard Power LED to light up when a certain function within UAVcast has started.
- UAVcast has started
- Modem has established internet connection.
- VPN connection established
- Undervoltage Detected
application update
UAVcast-Pro has embedded update functionality. Access the update page by clicking the version number as shown on the image below.


Rollback Version
You can rollback to previous versions if needed. Select from the dropdown menu and press Downgrade button. Application will as you to refresh the page when completed.
Check For Updates
Press this button to check if new version is available. If new version detected then press the “Update Now” button to start the installation. Application will as you to refresh the page when completed.
Rest API
UAVcast-Pro has an integrated RESTfull API activated by default from version 3.0.6. This could be useful when users want to interact or fetch information from 3rd party application.
Available routes
A !!! info
Routes should be added just after the RPI address.
example: `http://raspberrypi/api/castStatus`
-
GET
- /api/castStatus
- /api/piStatus
-
POST
- /api/{json object}
UAVcast casting status
- route
/api/castStatus - type: GET
This GET request will return casting status from UAVcast. Basically all the LED`s shown in the dashboard.
example
{
    "castStatus": {
        "mavproxy": false,
        "inadyn": false,
        "gstreamer": false,
        "modem": false,
        "systemdActive": false,
        "systemdEnable": false,
        "vpn": false,
        "undervoltage": false,
        "throttled": false
    }
}
Raspberry information
- route
/api/piStatus - type: GET
This GET request will return Raspberry PI information.
example
{
    "piStatus": {
        "time": {
            "current": 1552594820222,
            "uptime": 79975,
            "timezone": "GMT+0000",
            "timezoneName": "Greenwich Mean Time"
        },
        "raspModel": "Raspberry Pi 3 Model B Rev 1.2",
        "cpu": {
            "manufacturer": "ARMv7",
            "brand": "Processor rev 4 (v7l)",
            "vendor": "",
            "family": "",
            "model": "4",
            "stepping": "",
            "revision": "",
            "voltage": "",
            "speed": "1.20",
            "speedmin": "0.60",
            "speedmax": "1.20",
            "cores": 4,
            "physicalCores": 4,
            "processors": 1,
            "socket": "",
            "cache": {
                "l1d": "",
                "l1i": "",
                "l2": "",
                "l3": ""
            }
        },
        "fsSize": [
            {
                "fs": "/dev/root",
                "type": "ext4",
                "size": 15686586368,
                "used": 6556151808,
                "use": 41.79,
                "mount": "/"
            },
            {
                "fs": "/dev/mmcblk0p1",
                "type": "vfat",
                "size": 45281280,
                "used": 23083008,
                "use": 50.98,
                "mount": "/boot"
            }
        ],
        "memory": {
            "total": 918188032,
            "free": 184897536,
            "used": 733290496,
            "active": 484257792,
            "available": 492445696,
            "buffcache": 249032704,
            "swaptotal": 104853504,
            "swapused": 1855488,
            "swapfree": 68677632
        },
        "osInfo": {
            "platform": "linux",
            "distro": "Raspbian GNU/Linux",
            "release": "9",
            "codename": "",
            "kernel": "4.14.79-v7+",
            "arch": "arm",
            "hostname": "raspberrypi",
            "logofile": "raspbian",
            "serial": "",
            "build": ""
        },
        "cpuTemperature": {
            "main": 46.16,
            "cores": [],
            "max": 46.16
        },
        "lateancy": 15.546,
        "network": [
            {
                "iface": "eth0",
                "operstate": "up",
                "rx": 125885225,
                "tx": 493692274,
                "rx_sec": 5819.369225868111,
                "tx_sec": 5121.6948072634605,
                "ms": 6278
            }
        ]
    }
}
Actions
- route
/api/startCasting/{json object} - type: POST
Users can start and stop UAVcast from 3rd party application, this actions is eqvalent to press “Start Casting” or “Stop Casting” in the dashboard.
To interact with UAVcast actions, send a POST request in JSON (application/json) format with the following key:value pair:
Start UAVcast
{
    "action":"start"
}
Stop UAVcast
{
    "action":"stop"
}
The above commands will return the following JSON response
{
    "message": "Starting UAVcast",
    "initiated": true (false if command fails)
}
FAQ
Do i need a LTE modem?
No. UAVcast-Pro does not care if you use LTE, Wifi or Ethernet cable. As long as the application is able to communicate with the Ground Control station over TCP/IP stack, it will work.
Not able to open web interface
- Make sure you use latest raspberry image. Older version might be incompatible.
- You can type
journalctl -u UAVcast-Web.service --since yesterdayin the rpi console to get more debug information.
Where can i download latest version?
- See the installation instructions
Cannot activate UAVcast-Pro license
- Make sure you have proper internet connection for your RPI. During the validation, RPI needs to contact uavmatrix.com license server for validation.
Installation validation fails.
- Make sure you use a supported raspberry image as decribed in the installation instructions.
- For other installation issues, please navigate to
UAVcast-Pro/installfolder and copy theInstallation.logto your computer. Create a new discussion in our forum discuss.uavmatrix.com and attach the file.


Im not able to receive video or telemetry
- Make sure you have added video and telemetry port to your firewall rules.
- If you have changed the default ports for video 5600 or telemetry 14550 you need to change this on your ground control station device as well.
- Connect your FC to your computer and connect with Mission Planner. Goto all paramters list and search for the connection port used to Raspberry Pi. Serial0 (USB). Serial1 (Telem1 port), Serial2 (Telem2 port). Take note of the Mavlink Protocol (1 or 2) used, as well as the Baud rate. Make sure you use the same settings in UAVcast-Pro Flight Controller page.
No Mavlink Heartbeats received in UAVcast-Pro
- Make sure the configuration in UAVcast-Pro Flight Controller page reflects the settings in the Flight Controller. You can see the FC setttings using Mission Planner => All parameters list => search for Serial0 (USB) or Serial1 (Telem1 port) or Serial2 (Telem2)
- Make sure you are using a good USB cable with large cross-sectional area to minimize the voltage drop supplied to Fligth Controller.
- If you are connected by GPIO pins, make sure you have connected the ground, rx, tx wires correctly.
- Make sure you use default configuration in Flight Controller (Ardupilot, Px4) for UART / Telemetry ports.
Cant receive video, but telemetry works
- [PiCam] Please make sure you have enabled PiCam in the Raspberry config raspi-config
- [Logitech cams] Check logfiles and see if there is any errors. If you see Internal data stream error its most likey a unsupported resoultion or fps. Try play with those settings.
Other Application issues.
-
If you experience any issues with UAVcast running on your Raspberry, please Navigate to the UAVcast page and press “Download Logfiles” button. This will download a zip file containing all logs related to UAVcast and its running components. Log content will only contain application data and not user data.
Create a new discussion in our forum [discuss.uavmatrix.com](https://discuss.uavmatrix.com) and attach the zip file, or mail it to our support department [email protected] 
You can at any time contact us at [email protected] or chat privately on our Discord server https://discord.gg/xwqMTXh or use our forum section
https://discuss.uavmatrix.com

Zerotier VPN
UAVmatrix has made an agreement with zerotier team allowing us to bundle UAVcast-Pro with their application for non-commercial customers. We also developed our own web interface on top of zerotier controller https://uavnet.uavmatrix.com.
If you are unsure about your login credentials, please register at https://uavmatrix.com/my-account/ with the same email address used for UAVcast-Pro purchase and you will find the login details under “orders”.
All new customers will get an account at uavnet.uavmatrix.com with same expire date as the UAVcast-Pro license.
Zerotier usage instruction are described in uavnet dashboard.


The following wiki, pages and posts are tagged with
| Title | Type | Excerpt |
|---|---|---|
| px4 mavlink and qgc integration with 4gremoteoperation | post | Tue, Jan 18, 22, powerful 3d simulation environment for autonomous robots suitable for testing object-avoidance and cv |
| Airlink by skydrone, youtube | post | Friday, airlink for mission flight, LTE connectivity and dl-ready |
| set up with raspi connected to fc | post | Tue, Jan 25, 22, ardupilot documentation |
| drone programming primer for software development | post | Mon, Jan 31, 22, flight stack with firmware middleware and api |
| runcam with fc connection | post | Tue, Feb 15, 22, runcam split 2 with fc |
| my new fixed wing AR Wing Pro, ready for dji HD fpv system | post | Thu, Feb 17, 22, setup guide after opening the package |
| realflight 7 setup and console game | post | Thu, Feb 24, 22, flight simulation with real flight 7 |
| uavmatrix's cast pro docs | post | Tue, Mar 01, 22, another way to integrate devices to gcs |
| firmtech7 of naver cafe raspi drone project | post | Thu, Mar 03, 22, using raspi as fc to control small drone |
| Garupner Polaron ex | post | Sun, Mar 06, 22, polaron 2 channels dc charger |
| svg visualization messages and parameters | post | Mon, Mar 07, 22, organized structure and tree map of px4 messages and parameters |
| lx network, airlink, gcs and data transmission on smart radio, rf mesh and quantum encryption | post | Tue, Apr 26, 22, all about setup and how it operates and managed |
| rflysim tltr | page | |
| drones.md | page | my drones I work with and at my disposal. |
| my 100 supporters | page | my freelancers I work with since 2018. |
| index.md | page | My recent projects are leveraging generative AI across various domains, yielding significant achievements. These encompass Digital Twin, Voice-to-Command, RA... |
| About this site and its author | portfolio | My portofolio site and its mission statement |
| 🔭AIOT projects | page | summary. |
| contents deploy automation | page | Pilot test on the automation prototype. |
| pixhawk apm racing drone | page | summary. |
| Challenger Engineering Project | page | summary. |
| pixhawk tools | page | rFlyeval project details where Matlab Mathwor Simulink were used for complete process of UAV and UAS. |
| Korea drone companies | page | summary. |
| Racing drone, attck drone | page | summary. |
| Django Django Two scoops | page | summary. |
| docker learning curve | page | summary. |
| 🔭 Ground Control Station web-based approach | page | summary. |
| gitlab | page | summary. |
| 🔭lora monitoring app | page | summary. |
| 🔭 MQTT pages | page | summary. |
| My course list | page | my course list from udemy, udacity, NCS and other sources |
| Nextcloud | page | summary. |
| Automation pipeline | page | summary. |
| Pixhawk 4 | page | summary. |
| Pixhawk overview | page | summary. |
| 🔭yuneec realsense obstacle avoidance | page | summary. |
| ROS topic for micro control | page | summary. |
| 🔭 RQt-based gui | page | summary. |
| 🔭sensor detection | page | RealSense with Open3D |
| 🔭Serializer with API | page | summary. |
| Rules of thumb | page | Contact me for any support issues. |
| web-dev ops pages | page | |
| 🔭 Webrtc | page | summary. |
| pixhawk tools advanced | page | rFlyeval project details where Matlab Mathwork Simulink were used for complete process of UAV and UAS. |
| pixhawk tools | page | rFlyeval project details where Matlab Mathwor Simulink were used for complete process of UAV and UAS. |
| Bebop Drone Autonomy: ROS-based Flight Control and Hardware Modifications | post | Deep dive into Parrot Bebop drone modifications and autonomous flight control using ROS. Includes hardware modifications, UART connections, and custom flight... |
{# nothing on index to avoid visible raw text #}