Bebop Parrot drone
bebop parrot ardupilot connection
hacking bebop
building ardupilot for bebop2
.. _building-for-bebop-2:
==================== Building for Bebop 2 ====================
These instructions explain how to use ArduPilot for the
Bebop2 <https://www.parrot.com/us/drones/parrot-bebop-2?ref=#parrot-bebop-2-details/>__ on a Linux
machine. The Bebop 2 is based on the same architecture as the Bebop with
a few noticeable changes, not the least being a much better quality GPS
(UBlox GPS with a bigger antenna).
.. warning::
Making the changes described in this article will void your warranty! Parrot’s technical support will not help you with this hack or to recover your original software.
.. warning::
Hacking a commercial product is risky! This software is still evolving.
That said, it is almost always possible to recover a drone and members
of the ardupilot dev team can likely help people hacking or recovering
their Bebop on this google group <https://groups.google.com/forum/#!forum/bebop-ardupilot>__.
Building ArduCopter for Bebop 2
.. tip::
You can skip this step if you just want to try out the (experimental) binary version.
The following steps show how to build a custom version of the Copter software for Bebop 2:
Install armhf toolchain
#. Install Parrot’s version of linaro arm-linux-gnueabihf toolchain that can be downloaded from
here <https://firmware.parrot.com/Toolchains/parrot-tools-linuxgnutools-2016.02-linaro_1.0.0-5_amd64.deb>__
#. Install it (the toolchain will be extracted in /opt)
::
sudo dpkg -i parrot-tools-linuxgnutools-2016.02-linaro_1.0.0-5_amd64.deb
#. Add the path to the toolchain to the PATH variable
::
export PATH=/opt/arm-2016.02-linaro/bin:$PATH
Download and compile ArduCopter
#. Clone ardupilot repository
::
   git clone https://github.com/ArduPilot/ardupilot.git
   cd ardupilot
   git submodule update --init --recursive
#. Building the flight control firmware is nearly identical for
:ref:building for the Pixhawk <building-px4-with-make>
except the build command is:
#. ::
   ./waf configure --board=bebop
   ./waf build
Uploading the Firmware
Mission Planner can now upload stable and custom versions of ardupilot to the Bebop2.
.. youtube:: Ir0DyvlbTM0 :width: 100%
Instructions below are for the manual method of uploading
#. Install adb (android debug tool):
::
sudo apt-get install android-tools-adb
#. Connect to the Bebop2’s WiFi network (BebopDrone-XXXX). #. Enable adb server by pressing the power button 4 times. #. Connect to the Bebop’s adb server on port 9050:
::
adb connect 192.168.42.1:9050
#. If the previous command returns an error, try again (press the power button 4 times and retry). #. Remount the system partition as writeable:
::
adb shell mount -o remount,rw /
#. Push the stripped arducopter binary to the Bebop2:
::
   adb mkdir /data/ftp/internal_000/APM
   adb push arducopter /data/ftp/internal_000/APM/
Starting ArduPilot
#. Kill the regular autopilot:
::
   adb shell
   kk
#. Launch Copter:
::
   cd /data/ftp/internal_000/APM
   arducopter -A udp:192.168.42.255:14550:bcast -B /dev/ttyPA1 -C udp:192.168.42.255:14551:bcast -l /data/ftp/internal_000/APM/logs -t /data/ftp/internal_000/APM/terrain
Launch Copter at startup
As for Bebop, modify the init script /etc/init.d/rcS_mode_default. Comment the following line:
::
DragonStarter.sh -out2null &
Replace it with:
::
/data/ftp/internal_000/APM/arducopter -A udp:192.168.42.255:14550:bcast -B /dev/ttyPA1 -C udp:192.168.42.255:14551:bcast -l /data/ftp/internal_000/APM/logs -t /data/ftp/internal_000/APM/terrain &
#. Enable adb server by pressing the power button 4 times. #. Connect to adb server as described before:
::
adb connect 192.168.42.1:9050
#. Re-mount the system partition as writeable:
::
adb shell mount -o remount,rw /
#. In order to avoid editing the file manually, you can download this one <https://github.com/Parrot-Developers/ardupilot/releases/download/bebop-v0.1/rcS_mode_default>__.
#. Save the original one and push this one to the bebop
#. ::
   adb shell cp /etc/init.d/rcS_mode_default /etc/init.d/rcS_mode_default_backup
   adb push rcS_mode_default /etc/init.d/
#. Sync and reboot:
::
   adb shell sync
   adb shell reboot
Recovery
For recovery, you can use the same cable as the one used on Bebop, see
:ref:here <building-for-bebop-on-linux_recovery>.
#. Remove the two screws using a torx T6 screwdriver
.. image:: ../images/bebop_remove_screws.jpg :target: ../_images/bebop_remove_screws.jpg
#. Remove the neck by pulling it towards the front of the Bebop
.. image:: ../images/bebop_recovery_remove_neck.jpg :target: ../_images/bebop_recovery_remove_neck.jpg
#. The UART connector is located on the right side
.. image:: ../images/bebop_uart_connection.jpg :target: ../_images/bebop_uart_connection.jpg
#. Plug the cable with the black wire at the front
.. image:: ../images/bebop_connections3.jpg :target: ../_images/bebop_connections3.jpg
#. Connect to the bebop with the UART port using any terminal emulator #. Copy the backup rcS file back to its place
::
   mount -o remount,rw /
   cp /etc/init.d/rcS_mode_default_backup /etc/init.d/rcS_mode_default
#. Sync and reboot
::
   sync
   reboot
Flying and RC over UDP
Flying and RC over UDP instructions are the same as :ref:the ones for Bebop <building-for-bebop-on-linux_flying>
Basic configuration and frame parameters
#. The set of tuning parameters can be found
here <https://github.com/ArduPilot/ardupilot/blob/master/Tools/Frame_params/Parrot_Bebop2.param>__.
These are not yet fully tuned for Bebop 2
#. In order to do the basic configuration and calibration, you can use
any of the GCSs and perform:
#. Magnetometer Calibration #. RC Calibration #. Accelerometer Calibration
Additional information
The loiter mode quality is very good compared to the first Bebop because of the (much better) UBlox GPS. It is now safe to takeoff and land in the mode you want.
There is still no support for video yet and the optical flow and sonar are currently under development.
This is a good time to participate and help improve them!
bebop firmware flashing with UART
Here is my procedure once you get your usb cable with PIN ID tied to 1. Then download the 2 archives here : https://drive.google.com/drive/folders/1EWS_rFyLK9QZU39achJWOpyjjL1K6jQP?usp=sharing 28
mkdir ~/parrot
cp Bebop_Tools.tar.gz ~/parrot
cd ~/parrot
tar -xvf Bebop_Tools.tar.gz
sudo dpkg -i parrot-tools-installer-flashtools_5.9.47_all.deb
mkdir ~/.pinstrc
cp milos_linux_installer.tar.gz ~/.pinstrc
cd ~/.pinstrc
tar -xvf milos_linux_installer.tar.gz
Then unplug the battery of your bebop 2, plug the special USB cable.
Type sudo pinst_usb milos linux installer
Press the power button on your bebop 2.
Normally you should see messages on the console telling you the flashing is currently ongoing.
Scan Parrot ROM…
– found device : idVendor 0x19cf - idProduct 0x5037 - bcdDevice 0x0100 –
– Product: P7 USB Boot –
,
Send parrot bootloader /home/julien/.pinstrc/milos_inst_usb_bootldr.bin…
– bootloader loading OK –

Scan ParrotBoot device…
– found device : idVendor 0x19cf - idProduct 0x1111 - bcdDevice 0x0100 –
– Product: USB Stage 1 –
,
Send installer /home/julien/.pinstrc/milos_linux_installer_installer.plf…
the transfert took less than 1 second
– installer loading OK –
Scan Parrot installer…
– found device : idVendor 0x19cf - idProduct 0x1000 - bcdDevice 0x2499 –
– Product: Gadget Serial v2.4 –
,
Send payload /home/julien/.pinstrc/milos_linux_installer_payload.plf…
– 100 % complete –
the transfert took 26 s (957 KB/s)
Waiting flashing status…
– payload flashing OK –
And then you are done, though your bebop has gone back to an old version so you should update it asap to a more recent firmware version.
_swarming:
======== Swarming ========
Swarming/Formation-Flying Interface (Beta)
.. image:: ../images/radiohub.jpg :target: ../_images/radiohub.jpg
Mission Planner supports limited “swarming”, or formation-flying with multiple UAVs. At the moment this is in an experimental beta implementation, which is admittedly neither easy to use nor 100% reliable. However, if you’re interested in multiple-UAV coordination, this is a good place to start.
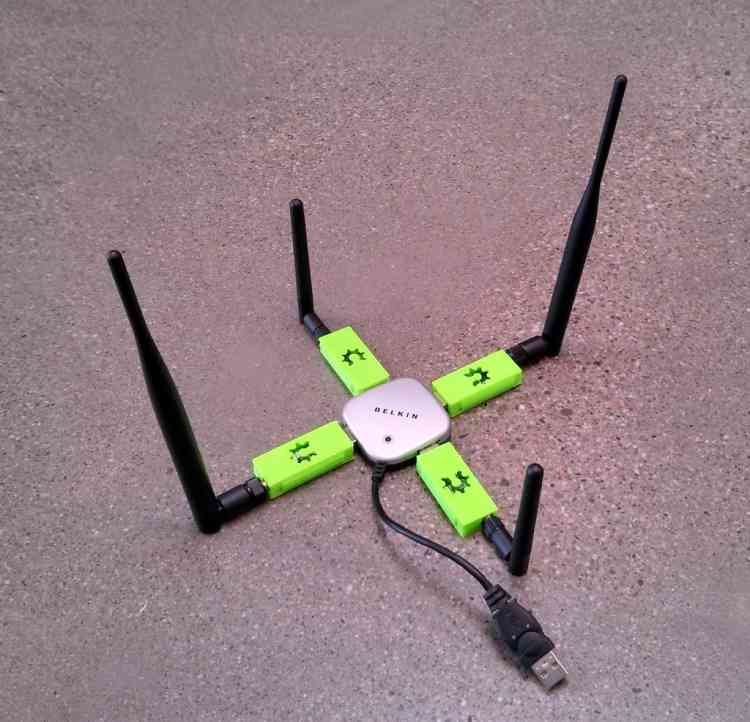
More sophisticated swarming/multiple-UAV control is available in QGroundControl and APM Planner 2.0, which are both built on a multiple-vehicle architecture. But Mission Planner accomplishes this in a limited way by simply opening multiple serial port MAVLink connections simultaneously (see four-UAV USB hub above) and passing GPS position information from one (“leader”, flying in any mode, from manual to auto) to the other (“followers”, flying in Guided mode). The GPS position of the leader is adjusted by a set offset and then sent to the followers as a series of dynamic waypoints. In this fashion the followers will follow the leader at set X,Y and Z offset distances.
This interface can be entered by pressing Control-F in the Mission Planner. That will bring up a pretty crowded box of buttons (see below), but the key ones are marked below: identifying the serial port of the “follower” UAVs, and the “swarm” button, which will bring up the second window, with a grid showing the relative position offset of the other UAVs.

.. figure:: ../images/mp_screen_with_swarming_button.png :target: ../_images/mp_screen_with_swarming_button.png
Mission Planner: Screen with SwarmButton
Setup Procedure:
#. Plug in one 3DR radio per vehicle #. Connect to the “leader” in the Mission Planner #. Press Control-F and click “swarm” #. Click “set leader” #. Click “Connect MAVs” (“MAV” stands for “micro air vehicle”). Click it once for each MAV. As each connects via MAVLink they will appear on the grid #. Drag the MAV circles around the grid to set the desired offsets. The Mission Planner assumes that “up” is North. #. “Start” will start sending Guided Mode waypoints to all vehicles except the leader.
Now, as you may have guessed, getting the starting position can be the hardest. In the grid they are identified by the MAV number and COM port. It’s a good idea to tape that MAV number to the physical vehicles themselves, so you can correspond the on-screen numbers and grid position with the physical layout of the vehicles on the ground.
Currently the code does no path prediction etc. A good place to start is with two quadcopters about 20 m apart to test, and work up from there.
First Flight:
#. Take off with the leader, sit at say 2-10 m high (loiter). The leader flight mode doesn’t matter #. Click start. This should make the follower take off in guided mode (it will take 3-5 seconds to launch) and sit at the same altitude as the master (assuming you haven’t changed the altitude offsets) #. Manually move the leaders, and the 2nd quad (follower) should follow. #. When you’re done, manually land the leader. Use the “Land” button to tell the follower to land, too.
Tips
- Don’t close the swarming screen, as it will stop the swarming. (Since we use guided mode, if you do the quad will just sit at the last commanded location.)
- The main map interface will show both quads.
- If you drag the quad around the grid screen, while it’s active. the quad should actually move as well.
- Increase the position stream rate in the mp. config>planner>position. to say 5, from the default of 3. to reduce the latency